> ## Documentation Index
> Fetch the complete documentation index at: https://docs.neynar.com/llms.txt
> Use this file to discover all available pages before exploring further.

# Farcaster Frames with Analytics using Neynar & Framejs

> In this guide, we’ll learn how to make a frame with the neynar SDK and Framejs, within a few minutes! For this demo, it will be a simple rock-paper-scissors game but it will give you an idea of how to create multi-page frames, interact with buttons, and get analytics for your frame with no extra effort.

Let's get started!

## Creating a new frames project

We will use Next.js to build the frame in this guide, but feel free to use anything else if you want!

Enter this command in your terminal to create a new app:

<CodeGroup>
  ```powershell PowerShell theme={"system"}
  yarn create frames
  ```
</CodeGroup>

Enter a name for your project, and choose the next template, and it will spin up a new project for you. Once the project is created install the dependencies:

<CodeGroup>
  ```powershell PowerShell theme={"system"}
  cd <project_name>
  bun install
  ```
</CodeGroup>

### Using the neynar middleware

Create a new file `frame.ts` and add the following:

<CodeGroup>
  ```typescript frame.ts theme={"system"}
  import { neynarValidate } from "frames.js/middleware/neynar";
  import { createFrames } from "frames.js/next";

  export const frames = createFrames({
    basePath: "/",
    middleware: [
      neynarValidate({
        API_KEY: process.env.NEYNAR_API_KEY!,
      }),
    ],
  });
  ```
</CodeGroup>

This creates an instance of the frame which uses neynarValidate as a middleware that we can re use in all the pages.

<Info>
  ### Make sure to update the API key to your API key to get analytics
</Info>

### Creating the frame home page

Create a new file `route.tsx` in the `app` folder and add the following:

<CodeGroup>
  ```typescript route.tsx theme={"system"}
  import { Button } from "frames.js/next";
  import { frames } from "../frames";

  const handleRequest = frames(async (ctx) => {
    return {
      target: "/result",
      image: (
        <div
          style={{
            alignItems: "center",
            background: "black",
            backgroundSize: "100% 100%",
            display: "flex",
            flexDirection: "column",
            flexWrap: "nowrap",
            height: "100%",
            justifyContent: "center",
            textAlign: "center",
            width: "100%",
          }}
        >
          <div
            style={{
              color: "white",
              fontSize: 60,
              fontStyle: "normal",
              letterSpacing: "-0.025em",
              lineHeight: 1.4,
              marginTop: 30,
              padding: "0 120px",
              whiteSpace: "pre-wrap",
            }}
          >
            Choose your weapon
          </div>
        </div>
      ),
      buttons: [
        <Button key="rock" action="post" target="/result">
          Rock
        </Button>,
        <Button key="paper" action="post" target="/result">
          Paper
        </Button>,
        <Button key="scissors" target="/result" action="post">
          Scissors
        </Button>,
      ],
    };
  });

  export const GET = handleRequest;
  export const POST = handleRequest;
  ```
</CodeGroup>

This will render an image saying choose your weapon and three buttons saying rock paper and scissors. When any of these buttons are clicked a request to the `/result` route is made which we define in the `target` prop.

<Frame>
  <img src="https://mintcdn.com/neynar/aGwjtKmNewHJXSzO/images/docs/23b5a01-image.png?fit=max&auto=format&n=aGwjtKmNewHJXSzO&q=85&s=2c630ce9dbbdf9018cffc688ac32348e" alt="Frame home page" width="1706" height="878" data-path="images/docs/23b5a01-image.png" />
</Frame>

<Info>
  ### Make sure that you sign in using your warpcast account, so that the requests can be validated
</Info>

Now, let's build the `/result` page. Create a new file called `result/route.tsx`

<CodeGroup>
  ```typescript index.tsx theme={"system"}
  import { frames } from "@/frames";
  import { Button } from "frames.js/next";

  const handleRequest = frames(async (ctx) => {
    const rand = Math.floor(Math.random() * 3);
    const choices = ["rock", "paper", "scissors"];
    const userChoice = choices[(Number(ctx.pressedButton?.index) || 1) - 1];
    const computerChoice = choices[rand];
    let msg = "";

    if (userChoice === computerChoice) {
      msg = "draw";
    }

    if (
      (userChoice === "rock" && computerChoice === "scissors") ||
      (userChoice === "paper" && computerChoice === "rock") ||
      (userChoice === "scissors" && computerChoice === "paper")
    ) {
      msg = "You win";
    }

    if (
      (userChoice === "rock" && computerChoice === "paper") ||
      (userChoice === "paper" && computerChoice === "scissors") ||
      (userChoice === "scissors" && computerChoice === "rock")
    ) {
      msg = "You lose";
    }

    return {
      action: "/frames",
      image: (
        <div
          style={{
            alignItems: "center",
            background: "black",
            backgroundSize: "100% 100%",
            display: "flex",
            flexDirection: "column",
            flexWrap: "nowrap",
            height: "100%",
            justifyContent: "center",
            textAlign: "center",
            width: "100%",
          }}
        >
          <div
            style={{
              color: "white",
              fontSize: 60,
              fontStyle: "normal",
              letterSpacing: "-0.025em",
              lineHeight: 1.4,
              marginTop: 30,
              padding: "0 120px",
              whiteSpace: "pre-wrap",
              display: "flex",
            }}
          >
            {userChoice} vs {computerChoice}
          </div>

          <div
            style={{
              color: "white",
              fontSize: 60,
              fontStyle: "normal",
              letterSpacing: "-0.025em",
              lineHeight: 1.4,
              marginTop: 30,
              padding: "0 120px",
              whiteSpace: "pre-wrap",
            }}
          >
            {msg}
          </div>
        </div>
      ),
      buttons: [<Button action="post">Play again</Button>],
    };
  });

  export const GET = handleRequest;
  export const POST = handleRequest;
  ```
</CodeGroup>

Here, we first get the button index from the ctx and use it to get the user's choice. We have then added some logic for generating a random choice for the game. Then, in the image we display the two choices and the result of the game. We have also added a play again game which simply pushes the user to the `/` route.

<Frame>
  <img src="https://mintcdn.com/neynar/4PNY113y9N9T-r9z/images/docs/d061b3f-Mov_to_Gif_conversion.gif?s=926ae7a1ab1cb38c7616257303ff4bf9" alt="Frame result page" width="2880" height="1800" data-path="images/docs/d061b3f-Mov_to_Gif_conversion.gif" />
</Frame>

## Analytics

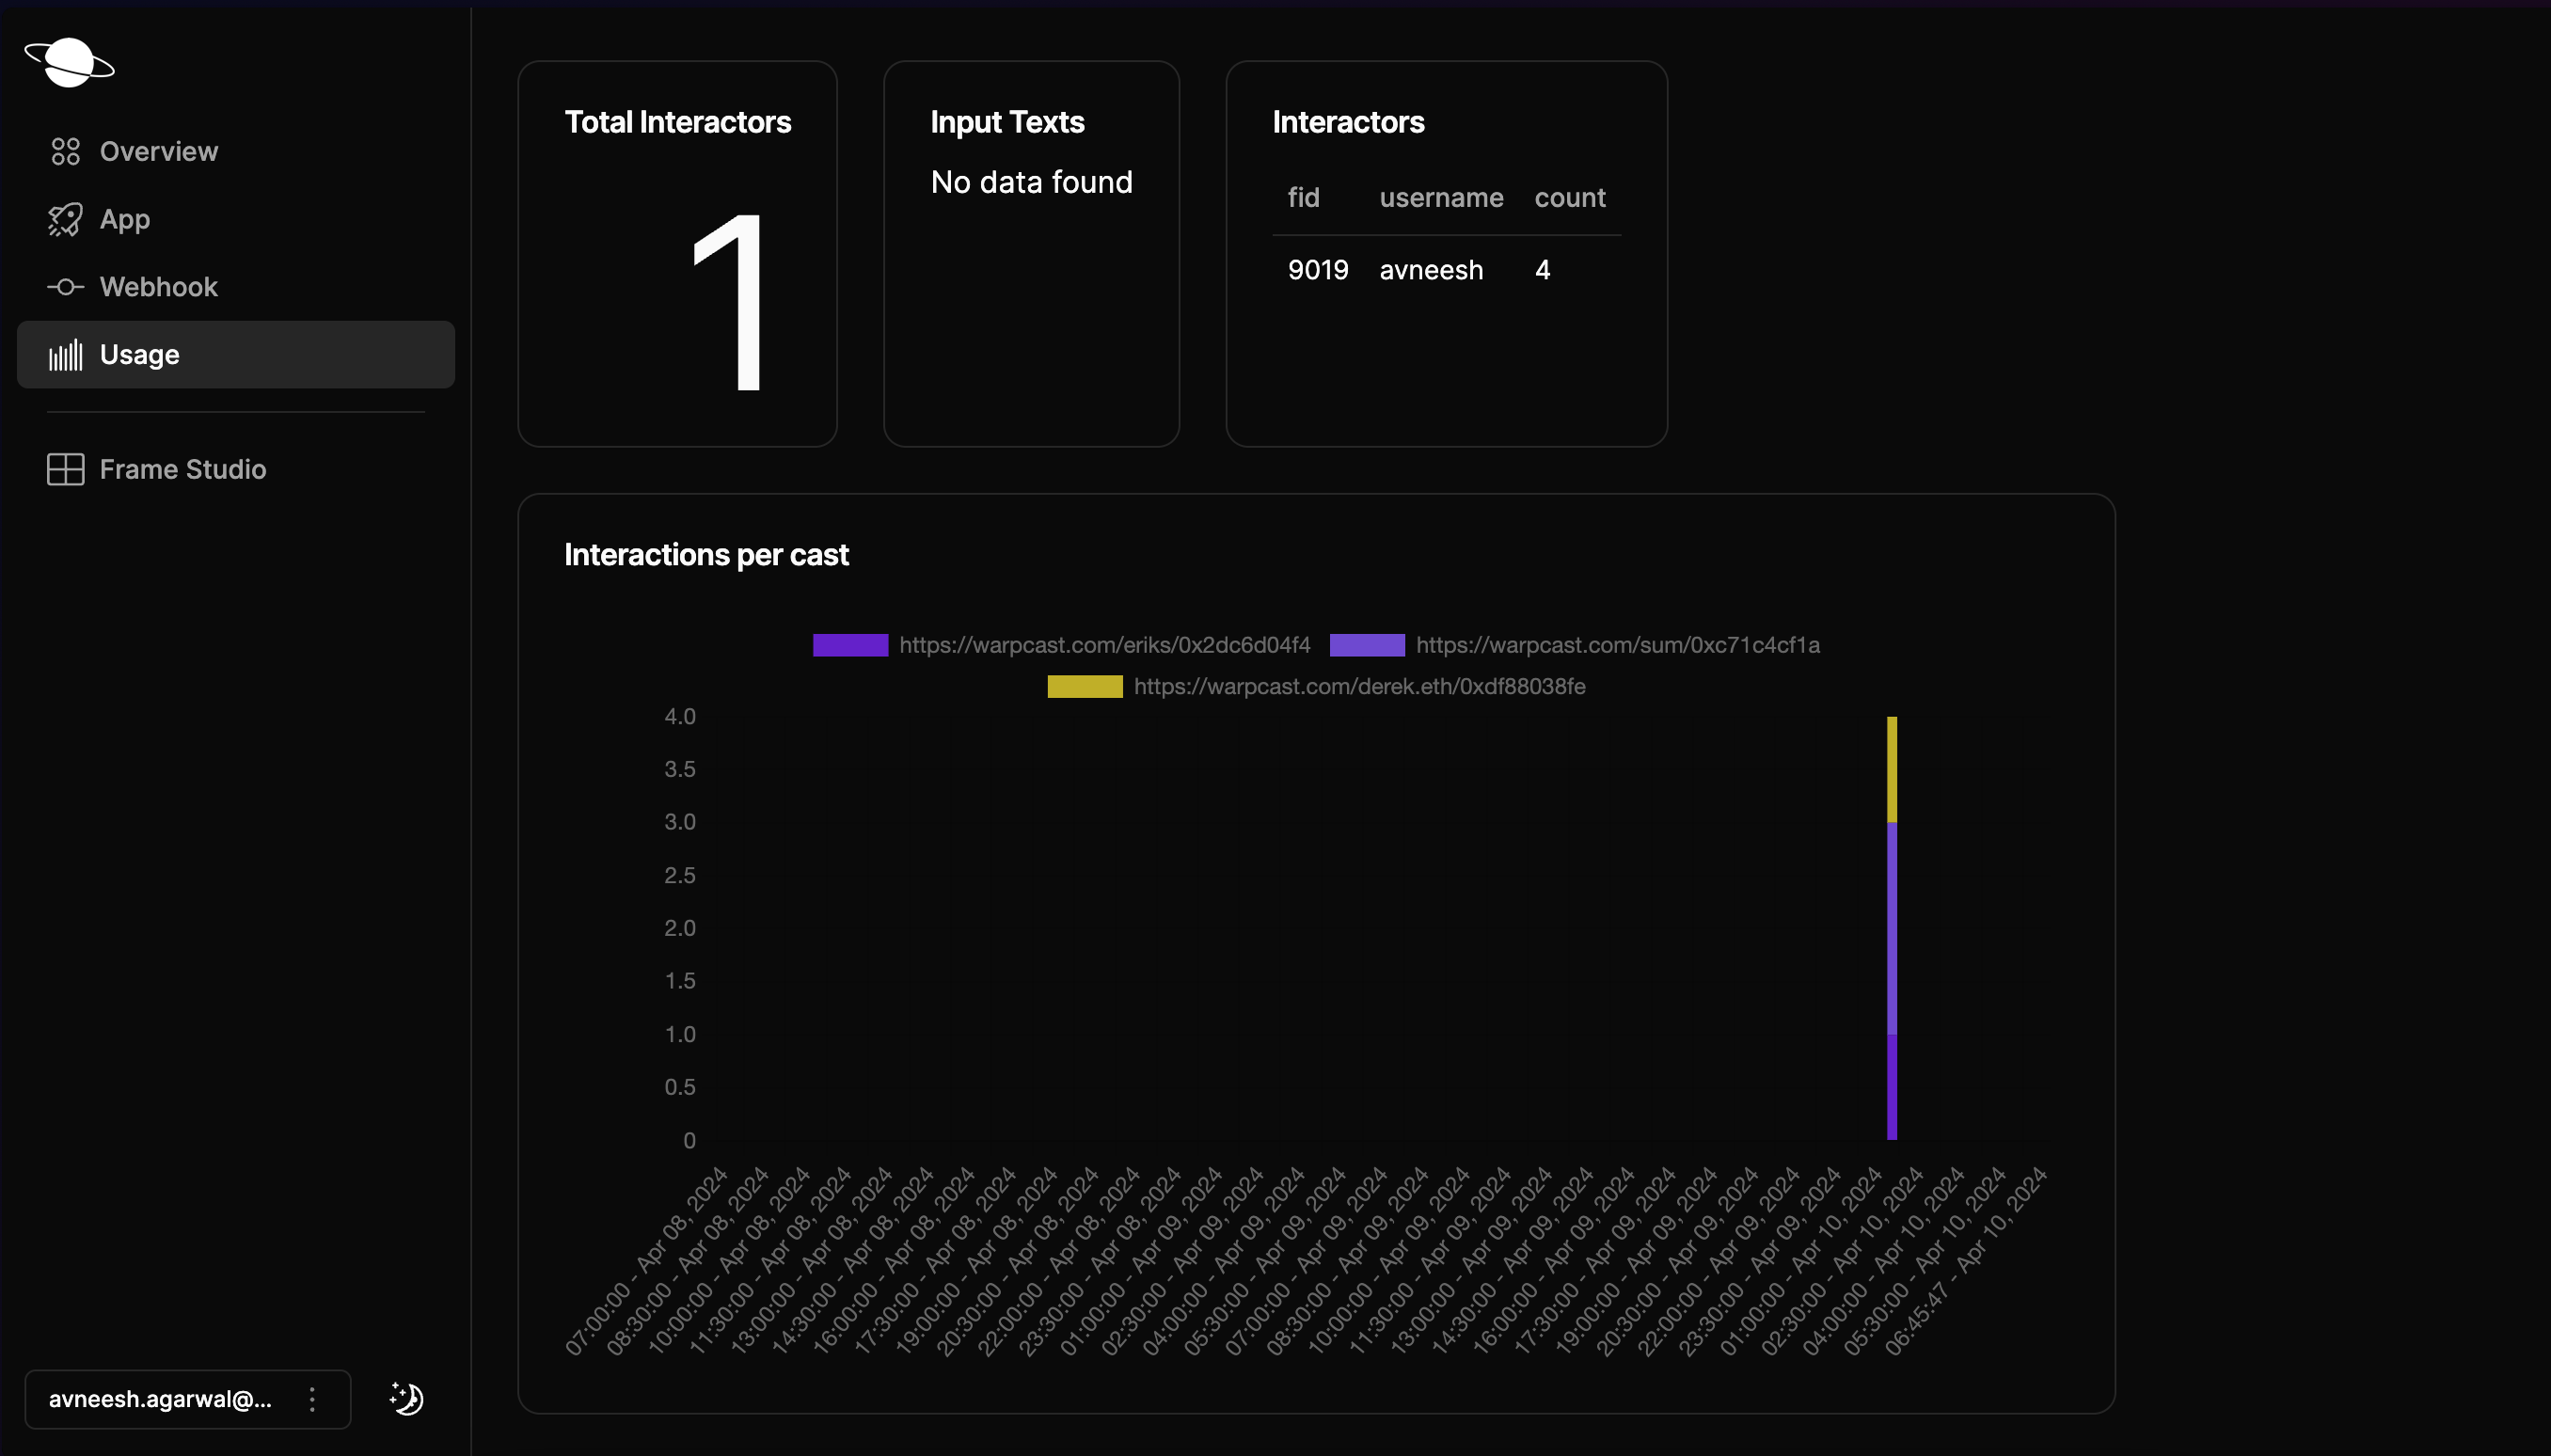
Since we are using neynar middleware with framejs, we also get analytics out of the box. Head over to the usage tab and click on the frame that you are currently using. It will provide you with various analytics like total interactors, interactions per cast, etc.
<Frame>
  <img src="https://mintcdn.com/neynar/aGwjtKmNewHJXSzO/images/docs/713fe83-image.png?fit=max&auto=format&n=aGwjtKmNewHJXSzO&q=85&s=da3d7ed1857d3ffc193a2c1a9870caf9" alt="Frame analytics" width="2712" height="1548" data-path="images/docs/713fe83-image.png" />
</Frame>

## Conclusion

This guide taught us how to create a rock-paper-scissors game on Farcaster frames using frames.js!

Lastly, please share what you built with us on Farcaster by tagging [@neynar](https://warpcast.com/neynar), and if you have any questions, reach out to us on [warpcast](https://warpcast.com/~/channel/neynar) or [Slack](https://neynar.com/slack)!
