> ## Documentation Index
> Fetch the complete documentation index at: https://docs.neynar.com/llms.txt
> Use this file to discover all available pages before exploring further.
# Write Data with Managed Signers
> Write to Farcaster protocol and let Neynar manage your signers for you
### If using login providers like Privy, it's best to use this signer product.
Users won't see a double login and developers will get full write functionality to Farcaster.
In this guide, we’ll take a look at how to integrate neynar managed signers with neynar in a next.js app *so your users can take actions on the Farcaster protocol.* Managed signers allow you to take full control of the connection, including the branding on Warpcast and everything else!
### To get started immediately, you can clone this [GitHub repository](https://github.com/neynarxyz/farcaster-examples/tree/main/managed-signers)
Run the app as per the readme page in the repo
## Context
This guide covers setting up a Next.js backend server to create and use Neynar Managed Signers for publishing a cast on Farcaster. The backend will:
1. Create a signer for the user.
2. Generate signature.
3. Provide API routes for frontend interactions.
4. Allow publishing casts on behalf of authenticated users.
You can integrate this backend with a compatible frontend to enable a seamless authentication and authorization flow using Neynar Managed Signers.
## The ideal user flow
**Terminology**
To understand the ideal user flow, let's quickly go over some terminology:
* Authentication: This is where an account proves they are who they say they are. Flows like Sign in with Farcaster (SIWF) or login providers like Privy allow this for app logins.
* Authorization: this is where an account gives the app certain access privileges to take actions on behalf of the account. This is what Neynar signers allow for writing data to the protocol.
Authorization requires authentication so that once a user is authenticated, they can then *authorize* an action. E.g. authenticating into your Google account to then authorize a 3rd party app like Slack to access your Google Calendar. If starting logged out, the full flow takes two distinct steps.
**User journey**
You can build a user flow using tools like:
* [SIWN: Connect Farcaster accounts](/docs/how-to-let-users-connect-farcaster-accounts-with-write-access-for-free-using-sign-in-with-neynar-siwn)
* or 3rd party login providers like Privy
If using Privy
* the 1st step on authentication happens on Privy login and the 2nd step of authorization happens on Neynar
* the second step requires the user to scan a QR code or tap on a link to then generate a signer on a Farcaster client like Warpcast. Generating a signer requires paying onchain fees
* Neynar [sponsors signers](/docs/two-ways-to-sponsor-a-farcaster-signer-via-neynar) by default so users pay \$0.
**Let's go!**
Now that we have context, let's get started!
## Requirements
1. **Node.js** ([LTS recommended](https://nodejs.org/en/download))
## Installation
1. **Next.js**
```bash theme={"system"}
npx create-next-app@latest neynar-managed-signers && cd neynar-managed-signers
```
2. **Dependencies** (to install via `npm`, `yarn`, etc.):
```bash npm theme={"system"}
npm i @farcaster/hub-nodejs @neynar/nodejs-sdk viem
```
```bash yarn theme={"system"}
yarn add @farcaster/hub-nodejs @neynar/nodejs-sdk viem
```
3. **Environment Variables**: Create a `.env.local` file in your Next.js project root and add:
```bash theme={"system"}
NEYNAR_API_KEY=...
FARCASTER_DEVELOPER_MNEMONIC=...
```
* **NEYNAR\_API\_KEY**: Get from [Neynar Dashboard](https://dev.neynar.com/app).
* **FARCASTER\_DEVELOPER\_MNEMONIC**: The mnemonic (typically a 12- or 24-word seed phrase that backs the wallet) for your developer account on Farcaster. e.g. `@your_company_name` account on Farcaster (to state the obvious out loud, you won't need user mnemonics at any point)
## Directory Structure
Make the following directory structure in your codebase
```bash theme={"system"}
└── app
├── api
│ ├── signer
│ │ └── route.ts
│ └── cast
│ └── route.ts
└── ...
└── lib
└── neynarClient.ts
└── utils
├── getFid.ts
└── getSignedKey.ts
└── .env.local
└── ...
```
## 1. `lib/neynarClient.ts`
Copy the following into a file called `lib/neynarClient.ts`
```typescript Typescript theme={"system"}
import { Configuration, NeynarAPIClient } from "@neynar/nodejs-sdk";
if (!process.env.NEYNAR_API_KEY) {
throw new Error("Make sure you set NEYNAR_API_KEY in your .env file");
}
const config = new Configuration({
apiKey: process.env.NEYNAR_API_KEY,
});
const neynarClient = new NeynarAPIClient(config);
export default neynarClient;
```
## 2. `utils/getFid.ts`
Copy the following code into a file called `utils/getFid.ts`
```typescript Typescript theme={"system"}
import neynarClient from "@/lib/neynarClient";
import { mnemonicToAccount } from "viem/accounts";
export const getFid = async () => {
if (!process.env.FARCASTER_DEVELOPER_MNEMONIC) {
throw new Error("FARCASTER_DEVELOPER_MNEMONIC is not set.");
}
const account = mnemonicToAccount(process.env.FARCASTER_DEVELOPER_MNEMONIC);
const { user: farcasterDeveloper } =
await neynarClient.lookupUserByCustodyAddress({
custodyAddress: account.address,
});
return Number(farcasterDeveloper.fid);
};
```
## 3. `utils/getSignedKey.ts`
Copy the following code into a file called `utils/getSignedKey.ts`
```typescript Typescript theme={"system"}
import neynarClient from "@/lib/neynarClient";
import { ViemLocalEip712Signer } from "@farcaster/hub-nodejs";
import { bytesToHex, hexToBytes } from "viem";
import { mnemonicToAccount } from "viem/accounts";
import { getFid } from "./getFid";
export const getSignedKey = async () => {
const createSigner = await neynarClient.createSigner();
const { deadline, signature } = await generate_signature(
createSigner.public_key
);
if (deadline === 0 || signature === "") {
throw new Error("Failed to generate signature");
}
const fid = await getFid();
const signedKey = await neynarClient.registerSignedKey({
signerUuid: createSigner.signer_uuid,
appFid: fid,
deadline,
signature,
});
return signedKey;
};
const generate_signature = async function (public_key: string) {
if (typeof process.env.FARCASTER_DEVELOPER_MNEMONIC === "undefined") {
throw new Error("FARCASTER_DEVELOPER_MNEMONIC is not defined");
}
const FARCASTER_DEVELOPER_MNEMONIC = process.env.FARCASTER_DEVELOPER_MNEMONIC;
const FID = await getFid();
const account = mnemonicToAccount(FARCASTER_DEVELOPER_MNEMONIC);
const appAccountKey = new ViemLocalEip712Signer(account);
const deadline = Math.floor(Date.now() / 1000) + 86400; // 24 hours
const uintAddress = hexToBytes(public_key as `0x${string}`);
const signature = await appAccountKey.signKeyRequest({
requestFid: BigInt(FID),
key: uintAddress,
deadline: BigInt(deadline),
});
if (signature.isErr()) {
return {
deadline,
signature: "",
};
}
const sigHex = bytesToHex(signature.value);
return { deadline, signature: sigHex };
};
```
We are doing a couple of things here, so let's break it down.
We first use the `createSigner` to create a signer, and then we use the `appAccountKey.signKeyRequest` function from the `@farcaster/hub-nodejs` package to create a sign key request. Finally, we use the `registerSignedKey` function from the neynarClient to register the signedKey. `registerSignedKey` returns `signer_approved_url` that needs to be handled (More on this in step 7)
## 4. `app/api/signer/route.ts`
Copy the following code into `app/api/signer/route.ts`
```typescript Typescript theme={"system"}
import { getSignedKey } from "@/utils/getSignedKey";
import { NextResponse } from "next/server";
export async function POST() {
try {
const signedKey = await getSignedKey();
return NextResponse.json(signedKey, { status: 200 });
} catch (error) {
console.error(error);
return NextResponse.json({ error: "An error occurred" }, { status: 500 });
}
}
```
## 5. `app/api/cast/route.ts`
Copy the following code into `app/api/cast/route.ts`
```typescript Typescript theme={"system"}
import neynarClient from "@/lib/neynarClient";
import { NextResponse } from "next/server";
export async function POST(req: Request) {
const body = await req.json();
try {
const cast = await neynarClient.publishCast({
signerUuid: body.signer_uuid,
text: body.text,
});
return NextResponse.json(cast, { status: 200 });
} catch (error) {
console.error(error);
return NextResponse.json({ error: "An error occurred" }, { status: 500 });
}
}
```
## 6. Run the app
Make sure nothing is running on port 3000. Ensure that your `.env.local` file is correctly set up before running the application.
```bash Shell theme={"system"}
yarn run dev
```
Now, the app is ready to serve requests. You can build a frontend to handle these requests, but for this demo, we'll use cURL.
## 7. cURL `/api/signer`
```bash Shell theme={"system"}
curl -X POST http://localhost:3000/api/signer \
-H "Content-Type: application/json"
```
Response
```json JSON theme={"system"}
{
"signer_uuid": "1234-abcd-5678-efgh",
"public_key": "0xabcdef1234567890...",
"status": "pending_approval",
"signer_approval_url": "https://client.warpcast.com/deeplinks/signed-key-request?token=0xf707aebde...d049"
}
```
You can either store the `signer_uuid` in the database or [use fetchSigners api to fetch signers for the user](/docs/fetch-signers-1) (We recommend the latter method)
Convert `signer_approved_url` to a QR code (For testing, you can use any online tool, e.g., [QRFY](https://qrfy.com/))
If the user is using the application on desktop, then ask the user to scan this QR code. If the user is on mobile, ask them to click the link. This will deeplink the user into Warpcast, and they will see the following screenshot.
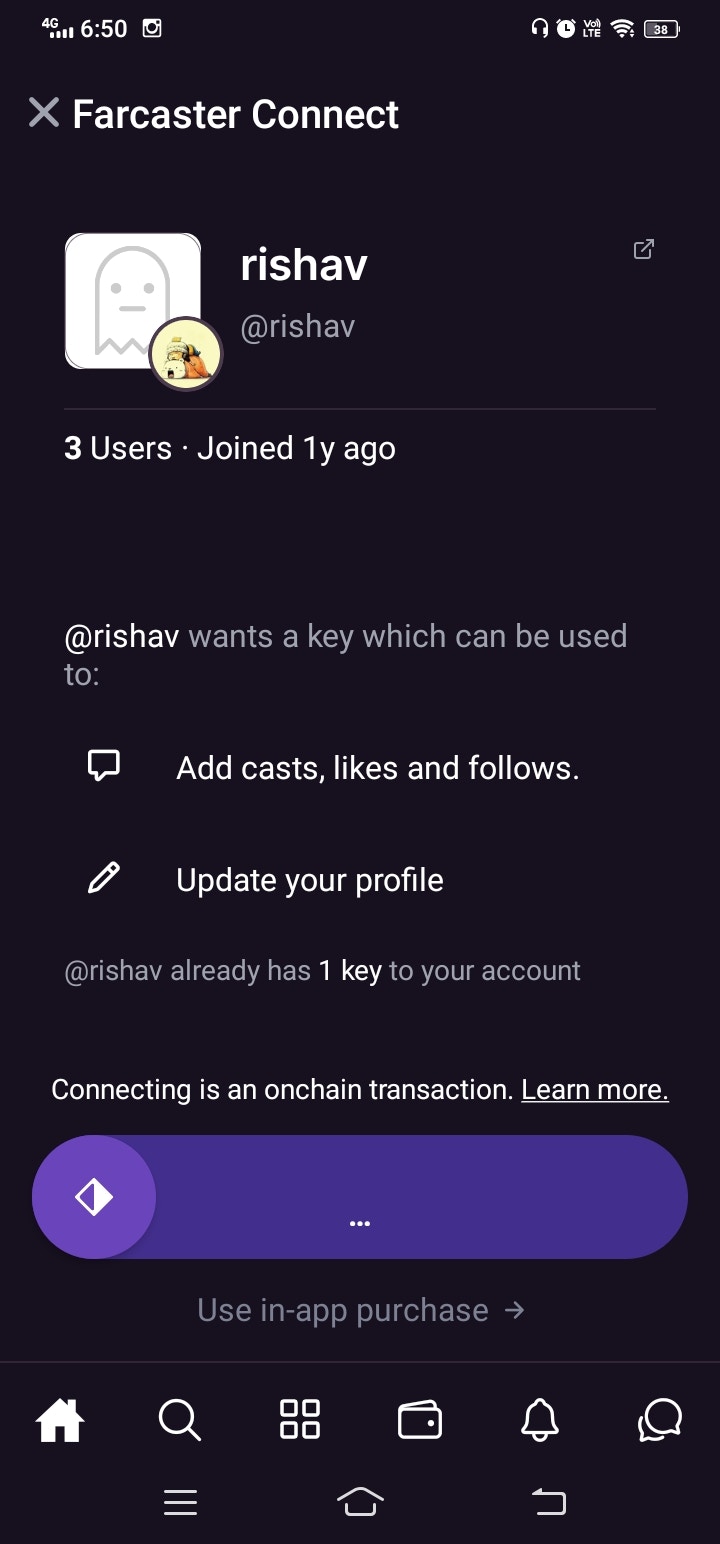 The user will need to pay for this on-chain transaction. (If you don't want users to pay, [you can sponsor it yourself or let neynar sponsor the signer](/docs/two-ways-to-sponsor-a-farcaster-signer-via-neynar))
## 8. cURL `/api/cast`
```bash Shell theme={"system"}
curl -X POST http://localhost:3000/api/cast \
-H "Content-Type: application/json" \
-d '{
"signer_uuid": "1234-abcd-5678-efgh",
"text": "Hello Farcaster!"
}'
```
Response
```json JSON theme={"system"}
{
"success": true,
"cast": {
"hash": "0xcda4f957b4c68883080f0daf9e75cea1309147da",
"author": {
"object": "user",
"fid": 195494,
"username": "rishav",
"display_name": "Neynet tester 1/14",
"pfp_url": "https://cdn-icons-png.freepik.com/256/17028/17028049.png?semt=ais_hybrid",
"custody_address": "0x7355b6af053e5d0fdcbc23cc8a45b0cd85034378",
"profile": {
"bio": {
"text": "12/19"
},
"location": {
"latitude": 36.2,
"longitude": 138.25,
"address": {
"city": "Nagawa",
"state": "Nagano Prefecture",
"country": "Japan",
"country_code": "jp"
}
}
},
"follower_count": 6,
"following_count": 50,
"verifications": [],
"verified_addresses": {
"eth_addresses": [],
"sol_addresses": []
},
"verified_accounts": [
{
"platform": "x",
"username": "unverified"
},
{
"platform": "github",
"username": "unverified"
}
],
"power_badge": false
},
"text": "Hello Farcaster!"
}
}
```
### Read more [Two Ways to Sponsor a Farcaster Signer via Neynar](/docs/two-ways-to-sponsor-a-farcaster-signer-via-neynar) to see how to *sponsor a signer* on behalf of the user
## Conclusion
With this backend setup, your Next.js app can:
* Generate Neynar Managed Signers for a single app. (`@your_company_name` account)
* Provide API routes for frontend interactions to handle signers and publishing casts.
This backend should be integrated with the corresponding frontend to enable a seamless login and cast publishing experience.
For the completed code with frontend intergation, check out the [GitHub repository](https://github.com/neynarxyz/farcaster-examples/tree/main/managed-signers).
If you encounter any issues, reach out to the [Neynar team for support](https://neynar.com/slack).
The user will need to pay for this on-chain transaction. (If you don't want users to pay, [you can sponsor it yourself or let neynar sponsor the signer](/docs/two-ways-to-sponsor-a-farcaster-signer-via-neynar))
## 8. cURL `/api/cast`
```bash Shell theme={"system"}
curl -X POST http://localhost:3000/api/cast \
-H "Content-Type: application/json" \
-d '{
"signer_uuid": "1234-abcd-5678-efgh",
"text": "Hello Farcaster!"
}'
```
Response
```json JSON theme={"system"}
{
"success": true,
"cast": {
"hash": "0xcda4f957b4c68883080f0daf9e75cea1309147da",
"author": {
"object": "user",
"fid": 195494,
"username": "rishav",
"display_name": "Neynet tester 1/14",
"pfp_url": "https://cdn-icons-png.freepik.com/256/17028/17028049.png?semt=ais_hybrid",
"custody_address": "0x7355b6af053e5d0fdcbc23cc8a45b0cd85034378",
"profile": {
"bio": {
"text": "12/19"
},
"location": {
"latitude": 36.2,
"longitude": 138.25,
"address": {
"city": "Nagawa",
"state": "Nagano Prefecture",
"country": "Japan",
"country_code": "jp"
}
}
},
"follower_count": 6,
"following_count": 50,
"verifications": [],
"verified_addresses": {
"eth_addresses": [],
"sol_addresses": []
},
"verified_accounts": [
{
"platform": "x",
"username": "unverified"
},
{
"platform": "github",
"username": "unverified"
}
],
"power_badge": false
},
"text": "Hello Farcaster!"
}
}
```
### Read more [Two Ways to Sponsor a Farcaster Signer via Neynar](/docs/two-ways-to-sponsor-a-farcaster-signer-via-neynar) to see how to *sponsor a signer* on behalf of the user
## Conclusion
With this backend setup, your Next.js app can:
* Generate Neynar Managed Signers for a single app. (`@your_company_name` account)
* Provide API routes for frontend interactions to handle signers and publishing casts.
This backend should be integrated with the corresponding frontend to enable a seamless login and cast publishing experience.
For the completed code with frontend intergation, check out the [GitHub repository](https://github.com/neynarxyz/farcaster-examples/tree/main/managed-signers).
If you encounter any issues, reach out to the [Neynar team for support](https://neynar.com/slack).