> ## Documentation Index
> Fetch the complete documentation index at: https://docs.neynar.com/llms.txt
> Use this file to discover all available pages before exploring further.
# SIWN: React
> In this guide, we'll take a look at how to implement sign-in with neynar in a React app. For this guide, I am going to be using next.js but the same would work for CRA, remix, or anything based on react!
For this guide, we'll go over:
1. Setting up auth using the Neynar React SDK
2. Using the signer to create casts
Before we begin, you can access the [complete source code](https://github.com/neynarxyz/farcaster-examples/tree/main/wownar-react-sdk) for this guide on GitHub.
Let's get started!
## Creating the app
### Setting up the project
Create a new next.js app using the following command:
```powershell Powershell theme={"system"}
npx create-next-app app-name
```
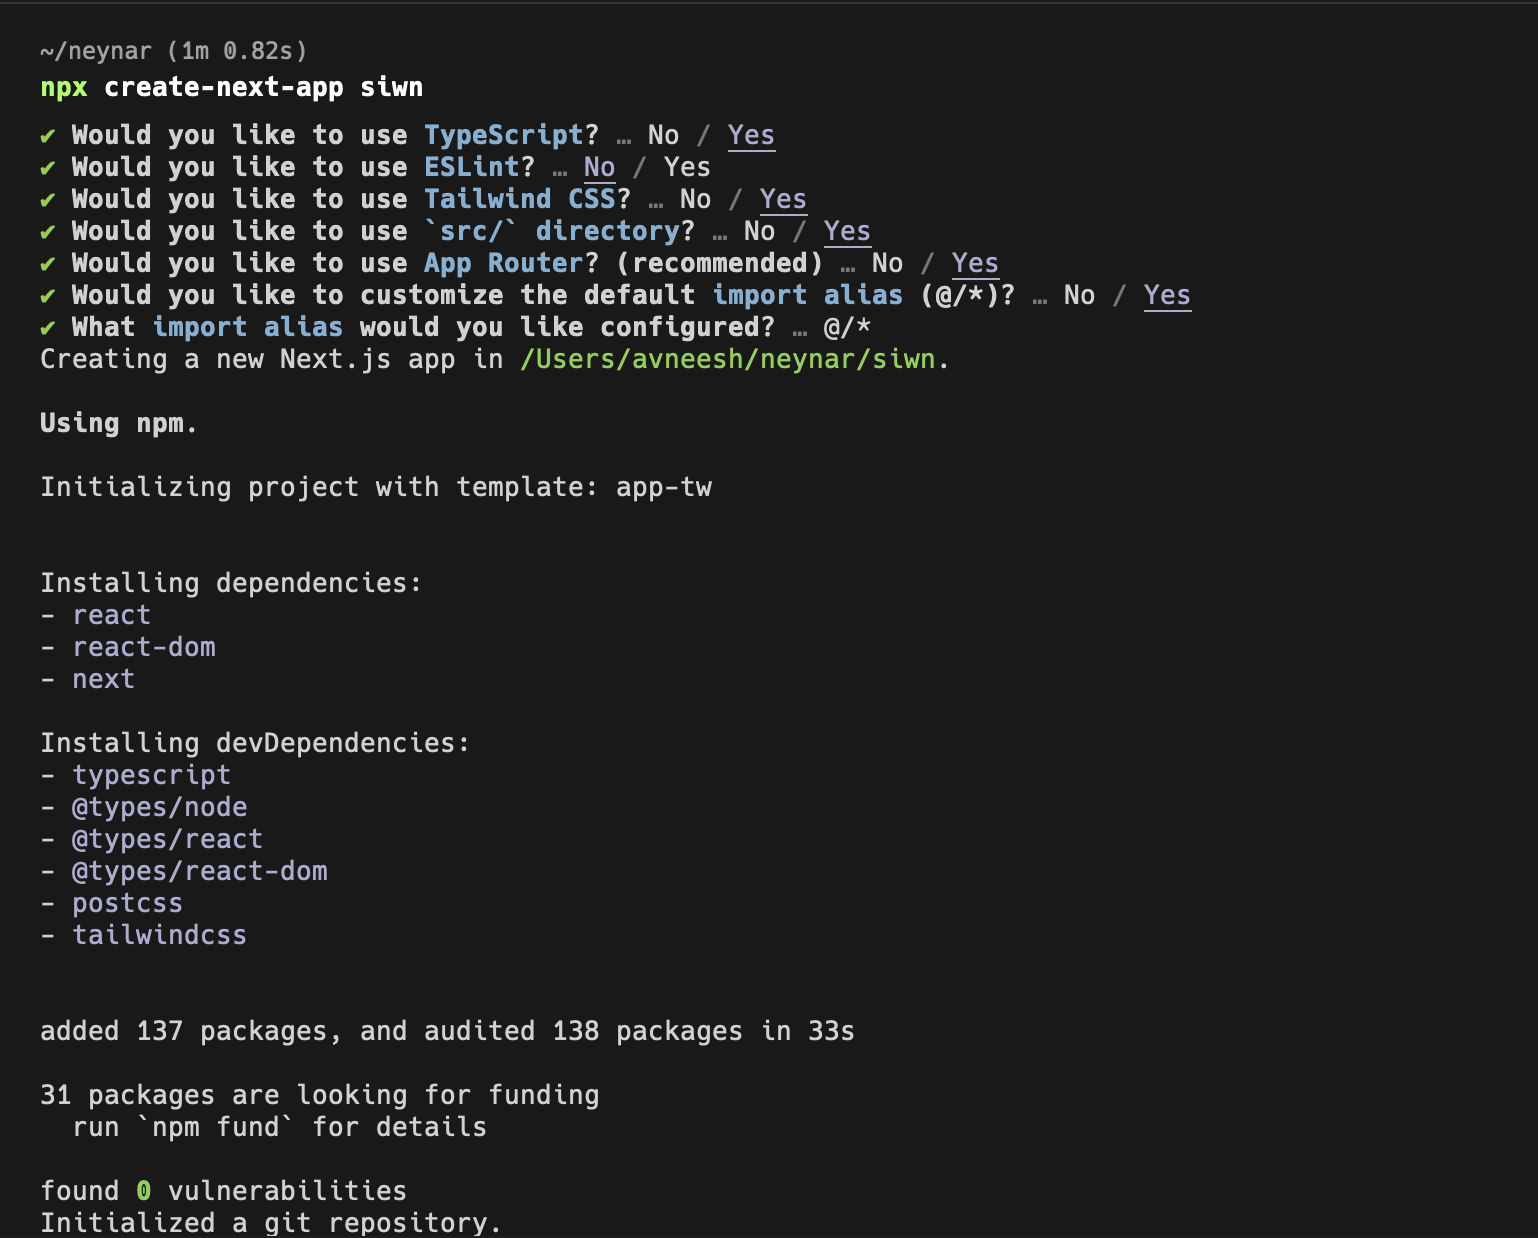
You can choose the configuration based on your personal preference, I am using this config for the guide:
 Once the app is created, install the packages that we are going to need for the command:
```shell npm theme={"system"}
npm i @neynar/react @neynar/nodejs-sdk axios
```
```shell yarn theme={"system"}
yarn add @neynar/react @neynar/nodejs-sdk axios
```
```shell bun theme={"system"}
bun add @neynar/react @neynar/nodejs-sdk axios
```
Install peer dependencies for `@neynar/react`
```shell npm theme={"system"}
npm i @pigment-css/react@^0.0.30 hls.js@^1.5.20 react@^19.0.0 react-dom@^19.0.0 swr@^2.3.2
```
```shell yarn theme={"system"}
yarn add @pigment-css/react@^0.0.30 hls.js@^1.5.20 react@^19.0.0 react-dom@^19.0.0 swr@^2.3.2
```
```shell bun theme={"system"}
bun add @pigment-css/react@^0.0.30 hls.js@^1.5.20 react@^19.0.0 react-dom@^19.0.0 swr@^2.3.2
```
Once the dependencies are installed you can open it in your favourite and we can start working on adding sign-in with neynar!
### Adding the sign-in button
Head over to the `layout.tsx` file and wrap your app in a `NeynarContextProvider` like this:
```typescript layout.tsx theme={"system"}
"use client";
import { NeynarContextProvider, Theme } from "@neynar/react";
import "@neynar/react/dist/style.css";
import { Inter } from "next/font/google";
import "./globals.css";
const inter = Inter({ subsets: ["latin"] });
export default function RootLayout({
children,
}: Readonly<{
children: React.ReactNode;
}>) {
return (
{},
onSignout() {},
},
}}
>
{children}
);
}
```
We are passing some settings here like `clientId`, `defaultTheme` and `eventsCallbacks`.
* `clientId`: This is going to be the client ID you get from your neynar, add it to your `.env.local` file as `NEXT_PUBLIC_NEYNAR_CLIENT_ID`.
Once the app is created, install the packages that we are going to need for the command:
```shell npm theme={"system"}
npm i @neynar/react @neynar/nodejs-sdk axios
```
```shell yarn theme={"system"}
yarn add @neynar/react @neynar/nodejs-sdk axios
```
```shell bun theme={"system"}
bun add @neynar/react @neynar/nodejs-sdk axios
```
Install peer dependencies for `@neynar/react`
```shell npm theme={"system"}
npm i @pigment-css/react@^0.0.30 hls.js@^1.5.20 react@^19.0.0 react-dom@^19.0.0 swr@^2.3.2
```
```shell yarn theme={"system"}
yarn add @pigment-css/react@^0.0.30 hls.js@^1.5.20 react@^19.0.0 react-dom@^19.0.0 swr@^2.3.2
```
```shell bun theme={"system"}
bun add @pigment-css/react@^0.0.30 hls.js@^1.5.20 react@^19.0.0 react-dom@^19.0.0 swr@^2.3.2
```
Once the dependencies are installed you can open it in your favourite and we can start working on adding sign-in with neynar!
### Adding the sign-in button
Head over to the `layout.tsx` file and wrap your app in a `NeynarContextProvider` like this:
```typescript layout.tsx theme={"system"}
"use client";
import { NeynarContextProvider, Theme } from "@neynar/react";
import "@neynar/react/dist/style.css";
import { Inter } from "next/font/google";
import "./globals.css";
const inter = Inter({ subsets: ["latin"] });
export default function RootLayout({
children,
}: Readonly<{
children: React.ReactNode;
}>) {
return (
{},
onSignout() {},
},
}}
>
{children}
);
}
```
We are passing some settings here like `clientId`, `defaultTheme` and `eventsCallbacks`.
* `clientId`: This is going to be the client ID you get from your neynar, add it to your `.env.local` file as `NEXT_PUBLIC_NEYNAR_CLIENT_ID`.
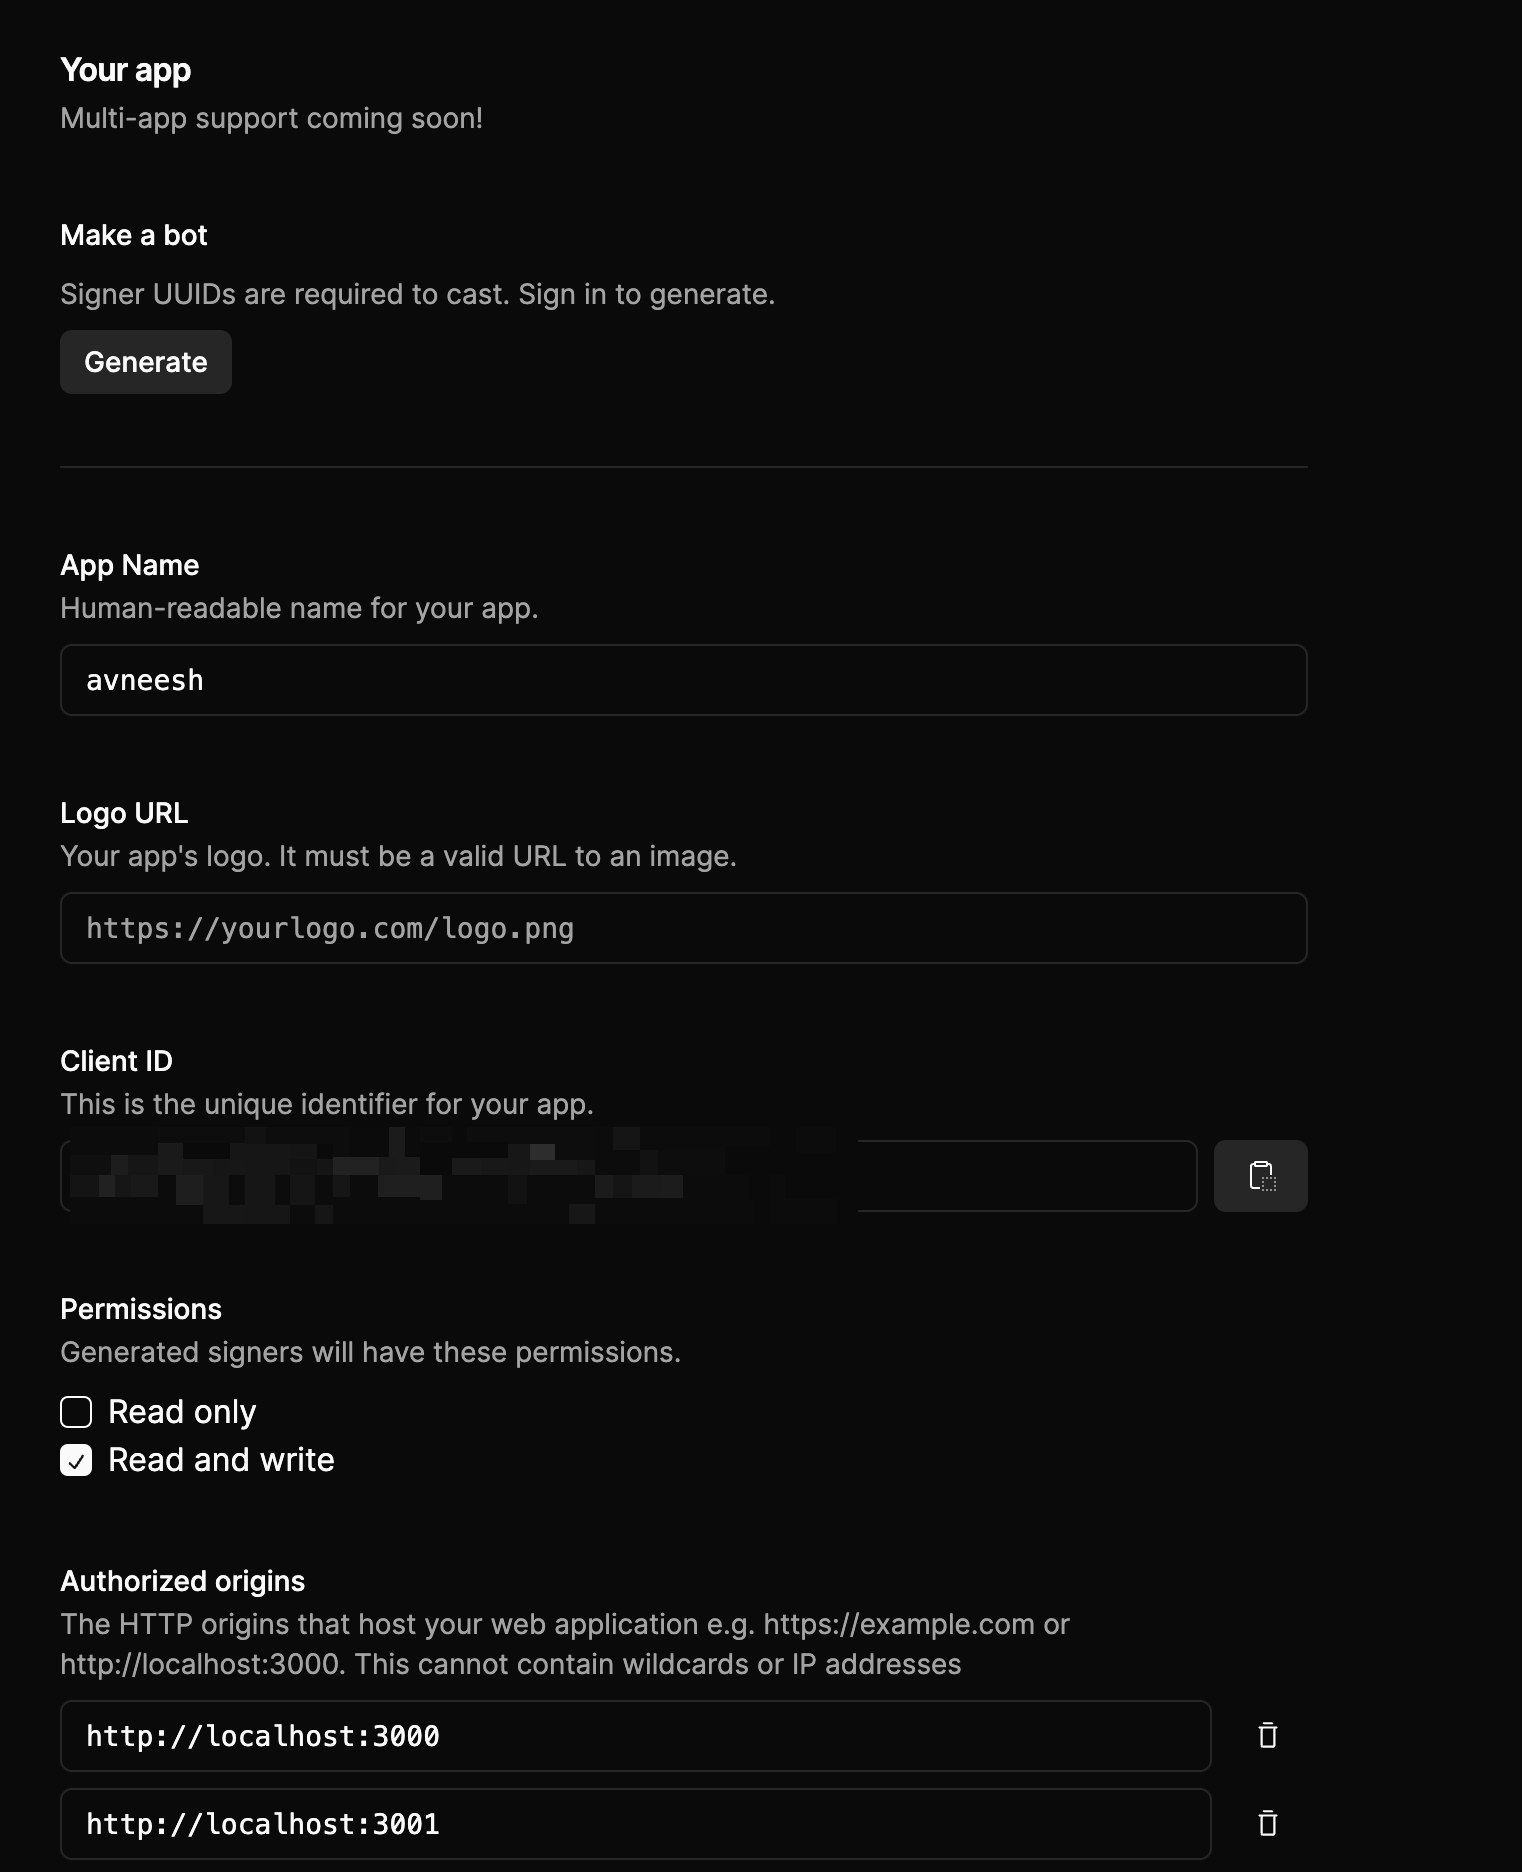 ### Make sure to add localhost to the authorized origins
* `defaultTheme`: default theme lets you change the theme of your sign-in button, currently, we have only light mode but dark mode is going to be live soon.
* `eventsCallbacks`: This allows you to perform certain actions when the user signs out or auth is successful.
I've also added a styles import from the neynar react package here which is needed for the styles of the sign-in button.
Finally, let's add the sign-in button in the `page.tsx` file like this:
```typescript page.tsx theme={"system"}
"use client";
import { NeynarAuthButton } from "@neynar/react";
export default function Home() {
return (
### Make sure to add localhost to the authorized origins
* `defaultTheme`: default theme lets you change the theme of your sign-in button, currently, we have only light mode but dark mode is going to be live soon.
* `eventsCallbacks`: This allows you to perform certain actions when the user signs out or auth is successful.
I've also added a styles import from the neynar react package here which is needed for the styles of the sign-in button.
Finally, let's add the sign-in button in the `page.tsx` file like this:
```typescript page.tsx theme={"system"}
"use client";
import { NeynarAuthButton } from "@neynar/react";
export default function Home() {
return (
);
}
```
If you head over to your app you'll be able to see a sign-in button on the screen. Go ahead and try signing in!
 Now that our sign-in button is working let's use the signer we get to publish casts!
### Using the signer UUID to publish casts
In the `page.tsx` file access the user data using the `useNeynarContext` hook like this:
```typescript page.tsx theme={"system"}
const { user } = useNeynarContext();
```
The user object contains various information like the username, fid, display name, pfp url, signer uuid, etc.
Then, we can use this user object to check whether the user has signed in and display a screen conditionally like this:
```typescript page.tsx theme={"system"}
"use client";
import { NeynarAuthButton, useNeynarContext } from "@neynar/react";
import Image from "next/image";
export default function Home() {
const { user } = useNeynarContext();
return (
{user && (
<>
Now that our sign-in button is working let's use the signer we get to publish casts!
### Using the signer UUID to publish casts
In the `page.tsx` file access the user data using the `useNeynarContext` hook like this:
```typescript page.tsx theme={"system"}
const { user } = useNeynarContext();
```
The user object contains various information like the username, fid, display name, pfp url, signer uuid, etc.
Then, we can use this user object to check whether the user has signed in and display a screen conditionally like this:
```typescript page.tsx theme={"system"}
"use client";
import { NeynarAuthButton, useNeynarContext } from "@neynar/react";
import Image from "next/image";
export default function Home() {
const { user } = useNeynarContext();
return (
{user && (
<>
{user.pfp_url && (
)}
{user?.display_name}
)}
);
}
```
Now, let's add a text area and a cast button here like this:
```typescript page.tsx theme={"system"}
{user && (
<>
{user.pfp_url && (
)}
{user?.display_name}