Easiest way to start is to integrate Sign in with Neynar
High-level overview
- App creates a signer using the Neynar API - POST /v2/farcaster/signer and gets the signer public key. The app maps the
signer_uuidto their internal user object. - The app creates a signature using the app’s fid, deadline, and the signer public key (Example gist)
- The app registers the signed key with the Neynar API - POST /v2/farcaster/signer/signed_key and gets an approval URL.
- App presents the user with the approval URL and begins polling the GET /v2/farcaster/signer API using the
signer_uuid. - The user opens the link and completes the Onchain Signer Add Request flow in the Warpcast mobile app.
- The app finds the user’s fid in the polling response.
- App uses
signer_uuidfor all Neynar Farcaster Write APIs on behalf of that user.
If you want dedicated signers, easiest way to start is to clone this example app repo
Detailed overview
Signer
A signer object contains the following fields:
signer_uuidThis uuid is generated on v2/farcaster/signer POST request and used across all other Neynar APIs. Once generated, we recommend mapping it to the user object within your app and storing it.status- generated | pending_approval | approved | revoked Represents the different states of a signer. We recommend storing this within your app to have users resume onboarding if they left mid-step.public_keyThis is the public key corresponding to the private key of the signers. It is a hex string format.fidThis represents the user’s fid.approval_urlThis is the deeplink url into Warpcast mobile app.
1 - The app creates a signer using the Neynar API - POST /v2/farcaster/signer and gets the signer public key. The app maps the signer uuid to their internal user object
This request creates a signer. Here’s a brief overview of what the signer’s state looks like after this initial request:signer_uuid- Returns an identifier for the signerstatus- Should begeneratedafter this POSTpublic_key- Returns the public key of this Neynar-managed signer.fid- At this stage it should be nullapproval_url- At this stage it should be null
2 - The app creates a signature using the app’s fid, deadline, and the signer public key
Apps requesting a user’s signer need to be verified by hubs and registered onchain. To do that, App’s have to sign a message to prove they are who they say they are. The signature should contain:- app’s fid - if you don’t have a farcaster account for your app, we recommend you create one. Otherwise, feel free to use your fid as the app’s fid
- deadline - indicates when the signature should no longer be valid. UNIX timestamp in seconds
- public key - to create the chain of trust from the user to the signer managed by Neynar, we need to include the public key of the signer in the signature as well. This should be the same as provided in the response by the Neynar API in Step 1.
signature will be of the format:
3 - App registers the signed key with the Neynar API - POST /v2/farcaster/signer/signed_key and gets an approval url
Once the signature along with other details is registered using this API, the signer state should look like the following: 1.signer_uuid - Unchanged. Same identifier for the signer 2. status - Changes to pending_approval after a successful POST request 3. public_key - Unchanged. 4. fid - Unchanged. At this stage, it should be null 5. approval_url - Changes to deeplink URL with the format like “farcaster://signed-key-request?token=0x54f0c31af79ce01e57568f3b”.
4 - The app presents the user with the approval URL and begins polling the GET /v2/farcaster/signer API using the signer_uuid
The app can present the approval URL if it’s on mobile or a QR code for the web. Once presented to the user, the App can start polling to fetch the status of the signer. The response for the polling API should include the pending_approval status and the same information as the response in Step 3.
5 - User opens the link and completes the Onchain Signer Add Request flow in the Warpcast mobile app
The user now needs to accept or decline interacting with the approval URL. If they choose to follow the deeplink or scan the QR, they should be routed to the Warpcast app on mobile to the following screen.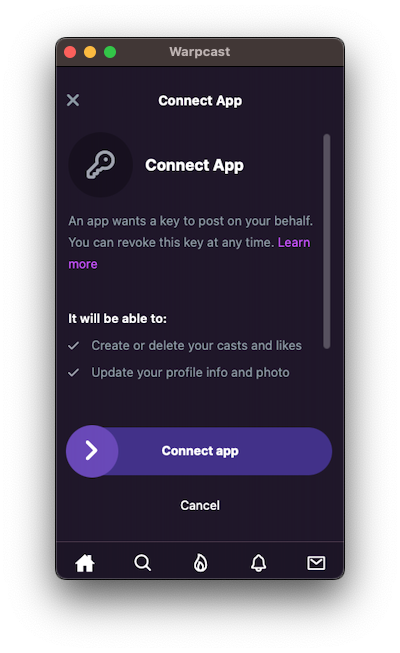
6 - The app finds the user’s fid in the polling response
If your App was polling while the onchain transaction was getting confirmed, then you should receive a change in the signer status:signer_uuid- Unchanged. Same identifier for the signerstatus- Changes to “approved”public_key- Unchanged.fid- Changes to an integer that represents the user’s farcaster idapproval_url- Unchanged
7 - App uses signer_uuid for all Neynar Farcaster Writes APIs on behalf of that user
The signer_uuid can now be used to write on behalf of a specific user on Farcaster. You’ll need a unique signer for each of your users. The signer_uuid generated using a developer account are not shared or cannot be used by another developer.